
How many different ways are there to roast a chicken? Please tell me. The number of skinned cats that I can think of that would have a good approximation is quite high. This article and recipe will review the essential steps that apply to all roasting techniques, as well as my three favorite methods: the “no-recipe” method, which is the easiest way to roast a chicken; spatchcocking; and finally, what I can only describe as the platonic ideal of roasting chicken.
While it may not be possible to go over every conceivable way to roast a chicken, this article and recipe will review the essential steps that apply to all roasting techniques. This final method, which results in a chicken that is perfectly cooked, evenly browned, and worthy of being featured on the cover of a magazine, is the recipe that I will share with you below. Even though our objectives for a roast chicken are straightforward, it is not as simple to accomplish them as it may seem.
Even if the white flesh and the dark meat cook at different rates and reach their respective stages of perfection at various temperatures, we still want both types of meat to have a juicy texture. However, despite the fact that the three-dimensional geometry of a bird makes it impossible to do this, we want the skin to be well browned all over.
Furthermore, despite the fact that it is a complete bird with a significant amount of meat that is difficult to access prior to carving, we want it to be seasoned evenly and thoroughly. Before we move on to a description of my three favored methods, let’s begin by taking a look at all of the tactics that we can and should employ to help provide those results, regardless of the cooking method that we choose.
Temperature: Knowing When the Bird Is Done
When it comes to huge roasts, the question “How long does it take to cook?” is considered to be the most frequently asked question by culinary writers like me. Although that is a question that can be understood, it is also the incorrect one. There are, without a doubt, some ballpark ranges that one may use in order to provide the chef with a rough sense of timing. That being said, your roast chicken will not be ready in fifteen minutes, nor will it take three hours; nonetheless, cooking by time is significantly more likely to result in undesirable outcomes than favorable ones.
Due to the fact that there are an excessive number of factors, it is not possible to provide an exact response to the time question. There is a wide range of sizes, weights, and body forms that chickens can be found in. An industrially bred “oven stuffer” weighing six pounds and containing a substantial quantity of breast meat will not be able to be cooked in the same length of time as a bird weighing three and a half pounds that is purchased at a farmer’s market.
And it doesn’t even take into account how hot the oven is, both in terms of the actual setting that the cook has picked as well as whatever temperature the oven is actually operating at (because, lord knows, many of them are improperly calibrated and are not cooking at the temperature that was selected). Even the most casual reader of Serious Eats should not be surprised by any of this information; this is the reason why we have placed an emphasis on internal temperature over time for many years.
:max_bytes(150000):strip_icc():format(webp)/20231031-SEA-HowtoRoastaChicken-step3-cb9a06ababff42668e6246d223058662.jpg)
If you want to know when your bird is cooked to perfection, the question that you should ask is not how long it has been cooking but how hot it has been cooking. In spite of the fact that the United States Department of Agriculture (USDA) suggests cooking chicken to an internal temperature of 165 degrees Fahrenheit, which almost removes any risk of foodborne pathogens such as salmonella, we advise the majority of home chefs not to go to such a high temperature, at least not for beef breast. When the white meat reaches a temperature of 150 degrees Fahrenheit, it is at its most juicy and soft.
This temperature is 15 degrees lower than what the USDA recommends. Additionally, it is around 15 degrees lower than the optimal doneness on the legs, which is approximately 165 degrees Fahrenheit. By virtue of the fact that dark meat contains a greater quantity of fat and connective tissue, it not only maintains its juiciness at higher temperatures, but it also develops a texture that is superior, more tender, and less chewy and slimy. To begin, let’s discuss the first part: why do we suggest cooking the breast at a temperature that is lower than the official guidance?
Therefore, as Kenji revealed to the readers of Serious Eats a very long time ago, the temperature at which undesirable bacteria die almost rapidly is 165 degrees Fahrenheit. However, it is possible to cook your meat at a lower temperature without risking its safety and yet accomplish the same effect of eradicating bacteria as long as you keep it at that temperature for a sufficient amount of time. Pull a chicken out of the oven when the breast meat is 150 degrees Fahrenheit in the center of its thickest part, and it will actually get hotter as it rests, a phenomenon known as carry-over cooking.
For example, chicken that has been cooked to 150 degrees Fahrenheit is safe to eat after the meat has remained at that temperature for just under three minutes. This is more or less guaranteed, given the size of the bird. After you have carved it and consumed it, the bird will be in a secure position.
The one thing that has not been resolved is the question of how to cook the bird in such a way that the breast reaches the internal temperature of 150 degrees Fahrenheit, while the legs have had the opportunity to get even hotter in order to get the appropriate level of doneness. On the other hand, there is no one technique for dealing with this matter, as each of the methods that I will detail below takes a different approach to it. Also, more on that in a moment.
How hot should your oven be?
When it comes to cooking a roast in such a way that the meat is tender and juicy throughout, we frequently resort to methods such as the reverse-sear. This method involves a longer period of low-and-slow cooking in order to bring the meat to its ideal internal temperature in the most gentle manner possible. After that, a final step of high-heat cooking is performed in order to give the whole thing a browned and roasty exterior.
:max_bytes(150000):strip_icc():format(webp)/20231031-SEA-HowtoRoastaChicken-step5-ec1300b41f3a405ea748c4cbaf4f1f22.jpg)
It is possible to accomplish this with chicken, but my experience has shown me that when it comes to chicken, it is preferable to simply use an oven that is fairly hot, somewhere between 400 and 425 degrees Fahrenheit. When compared to other types of Thanksgiving meat, such as prime rib or even a larger bird like a turkey, a roast chicken is a bit of an anomaly. As a result of the roast’s diminutive size, it does not take very much time at all for the meat to be cooAt the same time, lower temperatures make it difficult for the skin to brown properly over a period of time.
In an effort to quickly brown the skin at the very end of the cooking process, you run the risk of overcooking the chicken if you spend an excessive amount of time cooking it in a lower oven. Despite the fact that some recipes reverse this order, requiring a high-heat stage to initiate the browning of the skin and then a longer cook at a lower temperature to finish it off, I’ve discovered that all this really accomplishes is extending the cooking time without much reward in terms of the texture, the juiciness, or the browning of the skin.
An excellent roast chicken can be achieved by simply allowing it to remain in the higher temperature zone from the beginning to the end of the cooking process. Even more impressive is the speed with which it can be accomplished: you may have your bird on the table in less than an hour, which includes the time it takes to rest.
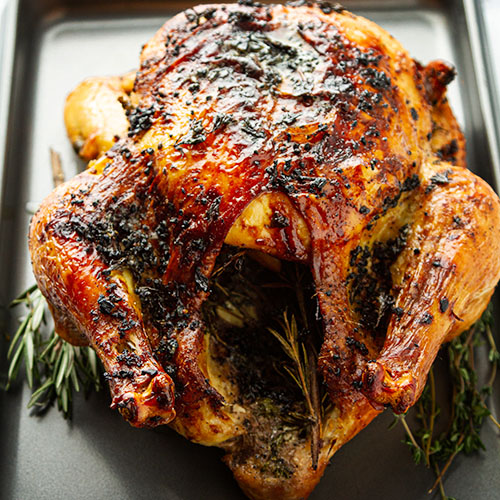
Secrets to Crisp, Brown Roast Chicken Skin
To begin, I would like to acknowledge that the phrase “crisp” is considered to be relative. Roast chicken skin, even the greatest roast chicken skin, does not have the same level of crispiness as the golden batter on fried chicken, nor does it have the same level of crispness as the skin that may be found on pan-roasted chicken. Both pan-roasted and fried chicken take advantage of the significantly higher heat that can be achieved through convection and conduction when the chicken is brought into contact with hot oil and/or hot metal.
The end product is something that can be described as being extremely crisp. It’s a little bit different when you roast chicken skin. It is crisp, to a certain extent and in a certain way, but it will not shatter and crunch as drastically as it would otherwise. Despite this, it is still one of the most delectable things that can be found anywhere on earth. How can one achieve the ideal skin on a chicken? In any case, the most important one is heat, as I mentioned earlier. Simply cooking the chicken in an oven that is nice and hot will result in a bird that is wonderfully browned, even if you do nothing else apart from that.
:max_bytes(150000):strip_icc():format(webp)/20230905SEA-HowtoCarveaRoastChicken-AmandaSuarez-00-1-e1530815c7b24c64b590f3aed245d5b3.jpg)
On the other hand, if we have the time, we can take steps to advance the browning process even further. One of the most efficient methods is to “dry-brine” the bird, which is a procedure in which the chicken is salted all over and then left to rest in the refrigerator and exposed to the air until the salt permeates into the meat and the skin dries out. This is one of the most effective approaches. It accomplishes two very significant things. A little magic in the way the salt works on the muscle proteins of the chicken makes it possible for it to produce outcomes that are more juicy and well-seasoned.
This is because the salt reduces the degree to which the flesh contracts as it is being cooked, which results in more juice being retained. The second advantage is that it allows the skin to dry out, which is essential because, as we all know, water is the enemy of browning any meal. The addition of a small amount of baking powder to the dry brine is yet another method that can be utilized to treat the chicken skin.
During the roasting process, the use of baking powder helps to form microbubbles in the chicken skin, which further enhances the browning and crisping of the chicken. Furthermore, it is alkaline, which has the effect of accelerating the Maillard reaction, which is a process that causes browning.
Baste the bird?
The answer is both yes and no. Well, in a sense. It is dependent. Some things that you should not use to bast the bird are as follows: any drippings that contain water, whether they are liquid that is emitted by the chicken as it is cooking or any other fluids that are water-based and have made their way into your roasting pan from another source. Moisturizing the skin will simply serve to slow down the browning process, which will ultimately result in a less golden and more flabby appearance.
Having said that, fat is a different story. You have the option of brushing the chicken with oil, clarified butter (keep in mind that conventional butter contains water, so you should avoid using that), rendered chicken fat, or any other fat that you have accessible to you. On the other hand, basting the meat repeatedly throughout the cooking period is not required, and it may even slow down the roasting process. It is important to remember that whenever you open the oven to baste your chicken, the oven is rapidly losing heat, which will cause the cooking process to slow down.

Due to the fact that the chicken will be roasted at a lower temperature than was originally intended, there is a greater possibility that it will dry out or get overcooked before it browns evenly. Because fat is so good at conducting high heat, giving the skin a good rubdown with oil or another fat before or immediately after throwing it in the oven will allow the skin to gleam and will improve how uniformly it browns.
This will eliminate the need to open the oven while the bird is cooking in order to baste it. Because it is virtually totally oil with only a bit of egg, vinegar, and seasonings, mayonnaise can be an efficient ingredient to delicately apply all over a bird before roasting. This is another reason why mayonnaise might be used. In conclusion, basting while cooking can be harmful for a variety of reasons, including the possibility of causing unwanted water to absorb by the skin and the possibility of causing the oven’s temperature to drop too much.
Tasteful Variations: Beyond the Basics
Since a long time ago, I have maintained that a roast chicken, just like a great number of other roasts, requires nothing more than salt in order to be dazzlingly excellent (provided that you make sure to salt it generously all over, both inside and out). I stand by that assertion; nevertheless, that does not mean that it is not wonderful to do a little bit more, given that you have the desire to do so. Listed below are some worthy choices:
- Herb Infusion: Instead of just using herbs as garnishes, infuse them into oils, vinegars, or liquids used in cooking. For example, infuse olive oil with rosemary, thyme, or basil for a fragrant base in dressings or marinades.
- Spice Blends: Create your own spice blends by mixing different spices together. Experiment with combinations like cumin, coriander, and smoked paprika for a Middle Eastern twist, or cinnamon, nutmeg, and allspice for a warm, comforting flavor.
- Citrus Zest: Incorporate the zest of citrus fruits such as lemon, lime, or orange into your dishes to add brightness and complexity. Zest can be added to marinades, sauces, salads, or even baked goods for a burst of flavor.
- Umami Boosters: Enhance savory dishes with umami-rich ingredients like soy sauce, miso paste, Worcestershire sauce, or fish sauce. These ingredients add depth and richness to soups, stews, sauces, and marinades.
- Roasting and Caramelization: Roasting vegetables or caramelizing onions and garlic can intensify their flavors, bringing out their natural sweetness and complexity. Try roasting vegetables like carrots, bell peppers, or cauliflower before adding them to salads or grain bowls.
- Smoke: Incorporate smoky flavors by using smoked ingredients such as smoked paprika, chipotle peppers, or smoked salt. You can also experiment with smoking techniques like smoking meats or vegetables over wood chips for a unique flavor profile.
- Fermented Foods: Experiment with fermented ingredients like kimchi, sauerkraut, or fermented hot sauces to add tanginess and depth to your dishes. These ingredients can be used as condiments, toppings, or incorporated into recipes for added flavor complexity.
- Fresh Herbs and Microgreens: Use fresh herbs and microgreens as finishing touches to add freshness and vibrancy to your dishes. Sprinkle chopped parsley, cilantro, or basil over savory dishes, or use microgreens like arugula or radish sprouts to garnish salads or soups.
- Nuts and Seeds: Toasted nuts and seeds can add crunch and nuttiness to dishes while also providing additional flavor and texture. Sprinkle toasted almonds, sesame seeds, or pine nuts over salads, stir-fries, or roasted vegetables for added depth.
- Exotic Ingredients: Explore ingredients from different cuisines to add intrigue to your dishes. Experiment with ingredients like coconut milk, curry paste, tahini, or harissa for a taste of international flavors.
Roasting Method 1: The Easiest
:max_bytes(150000):strip_icc()/MSL-356165-perfect-roast-chicken-hero-horiz-0723jpg-b006c10772a7474db113e0c7766591b1.jpg)
Despite the fact that this technique is so simple that it does not even need a recipe, I have decided to add it since the fact of the matter is that you can still cook a delicious roast chicken even if you do nothing extra at all. This includes not dry-brining, not trussing, and not spatchcocking the chicken. This approach takes nothing more than sprinkling the bird with salt on the inside and the outside and then placing it in the oven until it is cooked through.
There have been several occasions in my life when I have done just this because I was pressed for time or simply did not feel like doing anything more than the bare minimum, and I have never once regretted my decision to do so. You should know that there is no shame in doing this at home as well. I want you to know that.
It is the most significant disadvantage of this method that it does not solve the classic problem of roast chicken, which is that it leaves you with the challenge of deciding whether the breast meat is slightly overcooked or slightly undercooked (I mean, it would still be safe to eat, but it would not be quite as well done as the majority of us prefer it to be).
This does not make this procedure unpleasant since I believe that it is possible to totally strike a sweet spot that is really not awful. If you cook the breast and legs at temperatures between 155 and 160 degrees Fahrenheit, you will arrive at a point that is neither extremely dry for the white flesh nor overly pinkish for the dark meat. Another disadvantage of using this approach is that it is likely to result in skin that is not sufficiently browned on the thighs. This is because the thighs are located lower on the bird, which is where steam tends to accumulate and juices tend to trickle down. Although it is not flawless, it has the potential to be satisfactory enough.
Roasting Method 2: Spatchcocking
I continue to support the process of patchcocking the bird wholeheartedly, since it has been the favored way of Serious Eats for a very long time. It is possible to roast a spatchcocked bird in a short amount of time and ensure that it browns uniformly all over by removing the backbone and squeezing the chicken into a flat shape with the legs spread out and the breast in the center. Due to the fact that the legs are located on the sides of the bird, they are subjected to a greater amount of heat in comparison to the breast, which is located in the middle of the bird.
This helps to ensure that the cooking process is more even. With this procedure, you can then produce a fast jus while the chicken is roasting by using the cut-out spine, along with the wing tips and any other trimmings that you have. This is yet another significant advantage of this method. Overall, it is a fantastic method for preparing a bird to be cooked. Regarding the drawbacks, the presentation is the most significant one that comes to mind.
A bird that has been spatchcocked can be a stunning sight, but it does not quite live up to the image that is typically associated with a roast chicken. In addition, I find that a chicken that has been spatchcocked is slightly more challenging to carve. This is because the flattened position requires you to work at more acute angles while you are slicing the breast meat off of the breastbone and the rib cage.
You won’t find it challenging; it’s just a little bit more awkward. When compared to the other methods of cooking, the process of spatchcocking requires a little bit more effort on the part of the employee. Cutting through the spine does require a little bit more arm strength and effort than other exercises. A more in-depth look at the reasons why spatchcocking is such a terrific method may be found by reading the essay and recipe that Kenji has provided here.
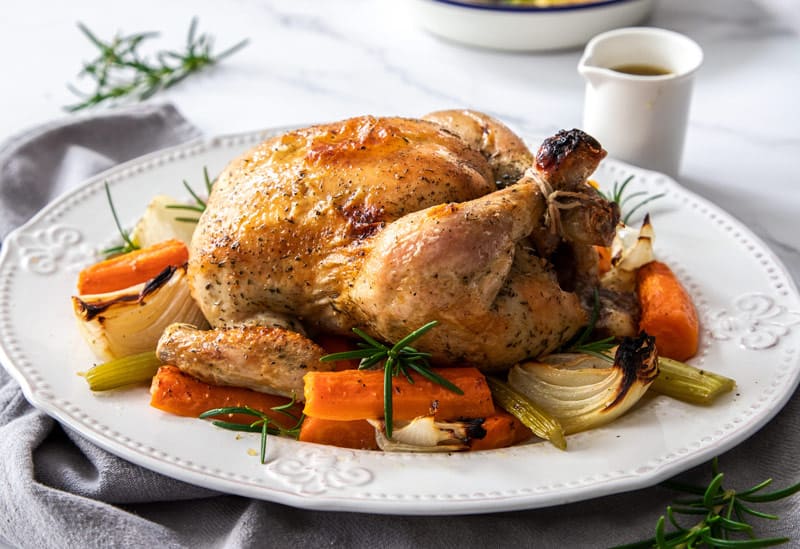
Roasting Method 3: The Picture-Perfect Classic Bird
I wanted to publish this article and recipe mostly because, up until now, we didn’t have a reliable method for cooking a chicken without spatchcocking. I understand that sometimes all you want is a traditional roast bird—the kind of dish that French chefs strive to master throughout their careers. I am certain that I do. Furthermore, there are other approaches to overcoming the difficulties of roasting chicken than spatchcocking. If you don’t think the bird in the above photo is the most beautiful thing you have ever seen, just take a look at it.
I’m glad to announce that my dad’s first words upon seeing me were, “Not too pretty, is he?” Some of you are undoubtedly thinking that your newborn child is the most beautiful thing you have ever seen, but let’s be real: only parents can see how goofy-looking their babies are at first. Thank you for being so honest. Among the three methods, this one requires the most time due to the additional step of heating the legs on the stovetop before roasting them in the oven. I had previously stated that the skin of a pan-roasted chicken piece develops more extreme browning and crisping due to direct contact with a hot pan, whereas the skin of a complete roast chicken does not get as crisp.
That’s precisely what we’re going to do in this instance. But trussing the chicken is the first step. Trussing performs two functions: Firstly, it simplifies handling the chicken by turning it into a neat little package, which comes in handy when pan-roasting it before baking it. Another important factor in the bird’s visual appeal is its neat, small package. Compared to the bird above, which has its legs dangling out to the sides, it appears much more elegant.
Additionally, some people believe that trussing helps plump up and compress the breast, which slows down the cooking process and evens out the doneness of the meat. I’ve seen many equally convincing reasons that the bird cooks more slowly when its legs are pressed firmly into its body, and to be honest, that makes more sense in my own experience. I’m not sure whether I should buy that.

However, that is irrelevant because we will still counteract that. The clever trick with this technique, as you can see from the pictures, is to place the bird in the pan on its side so that one leg touches the metal (the wing will touch it as well). By doing this, heat is transferred to the legs without greatly warming the breast, giving them a head start on cooking and allowing them to reach their appropriate final temperature approximately simultaneously with the breast. After browning one side, you just need to turn the bird over and cook the other side in the same manner. Finally, you can place the chicken upright in the oven to finish roasting.
- Select the right chicken: Choose a fresh, high-quality chicken for the best results. Look for a plump bird with smooth, unblemished skin.
- Preparation:
- Preheat your oven to 425°F (220°C) to ensure even cooking.
- Remove the chicken from the refrigerator about 30 minutes before cooking to allow it to come to room temperature, which promotes more even cooking.
- Pat the chicken dry with paper towels, both inside and out. This helps the skin crisp up during roasting.
- Optionally, you can truss the chicken (tying the legs together with kitchen twine) to help it cook more evenly.
- Seasoning:
- Season the chicken generously with salt and pepper, both inside the cavity and all over the skin. You can also add herbs and spices to the seasoning mix for extra flavor.
- Optionally, you can also stuff the cavity with aromatics like garlic cloves, lemon wedges, fresh herbs (such as rosemary, thyme, or sage), or onions to infuse the chicken with additional flavor.
- Roasting:
- Place the seasoned chicken breast-side up on a roasting rack set in a roasting pan. Elevating the chicken allows air to circulate around it, resulting in crispy skin all around.
- Roast the chicken in the preheated oven. The cooking time will vary depending on the size of the chicken, but a general guideline is to roast it for about 20 minutes per pound (45 minutes per kg), plus an additional 15 minutes.
- Baste the chicken occasionally with pan juices or melted butter to keep it moist and flavorful.
- Checking Doneness:
- To ensure the chicken is cooked through, use a meat thermometer inserted into the thickest part of the thigh without touching the bone. The internal temperature should reach 165°F (75°C) to be safely cooked.
- Alternatively, you can check for doneness by piercing the thigh with a knife or skewer; the juices should run clear, and the meat should no longer be pink.
- Resting:
- Once the chicken is cooked through, remove it from the oven and tent it loosely with foil. Let it rest for about 10–15 minutes before carving. Resting allows the juices to redistribute throughout the meat, resulting in juicier chicken.
- Carving:
- Carve the chicken into serving pieces and arrange them on a platter. Serve with your favorite sides and enjoy your perfectly roasted chicken!
Leave a Reply